OpenShot is a free and open source video editor that is available for all major operating systems, including Linux. It has a simple interface that provides all basic features you'll need for basic video editing operations: slicing and mixing videos, changing video speed and audio volume, operating multiple tracks of video and audio, generating titles, exporting projects to several formats, among other things.
In this guide, you'll learn how to use OpenShot to edit videos on Ubuntu Linux. We'll see how to install, how to add media to your project, how to slice videos and change video speed, how to change audio volume and how to export videos for YouTube.
Requirements
This guide was developed and tested within the following environment:
- Linux Ubuntu 21.10
- OpenShot v2.6.0 installed from the official PPA
Installing OpenShot
When installing OpenShot on Linux (Ubuntu), you have the choice of using an AppImage package or installing OpenShot through its official PPA with apt. Choose only one method to avoid issues where you have multiple OpenShot versions installed on your system.
Installing via AppImage
Installing from the AppImage is the easiest way to get started, and you should be able to get the latest OpenShot version this way. The downside is that sometimes applications installed with this method are a bit more unstable, and you may experience some interface weirdness such as differences in menu and icon sizes compared to other applications installed on your system.
If you choose the AppImage, you need only to download the AppImage file and set it to executable with the following command from your terminal:
chmod +x OpenShot-v2.6.1-x86_64.AppImage
Then, to execute OpenShot in background mode, run:
./OpenShot-v2.6.1-x86_64.AppImage &
Then you should get a dialog asking if you want to have a desktop file installed for this OpenShot version. Choose "yes" to get OpenShot added to the system shortcuts, so you can hit the "window" key and search for OpenShot in the quick finder menu.
Installing via PPA
The advantage of installing from an official PPA is that you get an overall more stable installation on your system. That is why I prefer this method over using a PPA. You'll need to run a few commands from your terminal to get it done.
Run the following commands to get OpenShot installed system-wide:
sudo add-apt-repository ppa:openshot.developers/ppa
sudo apt update
sudo apt install openshot-qt python3-openshot
To open the application, hit the "window" key and type "openshot", and you should be able to find OpenShot in the results.
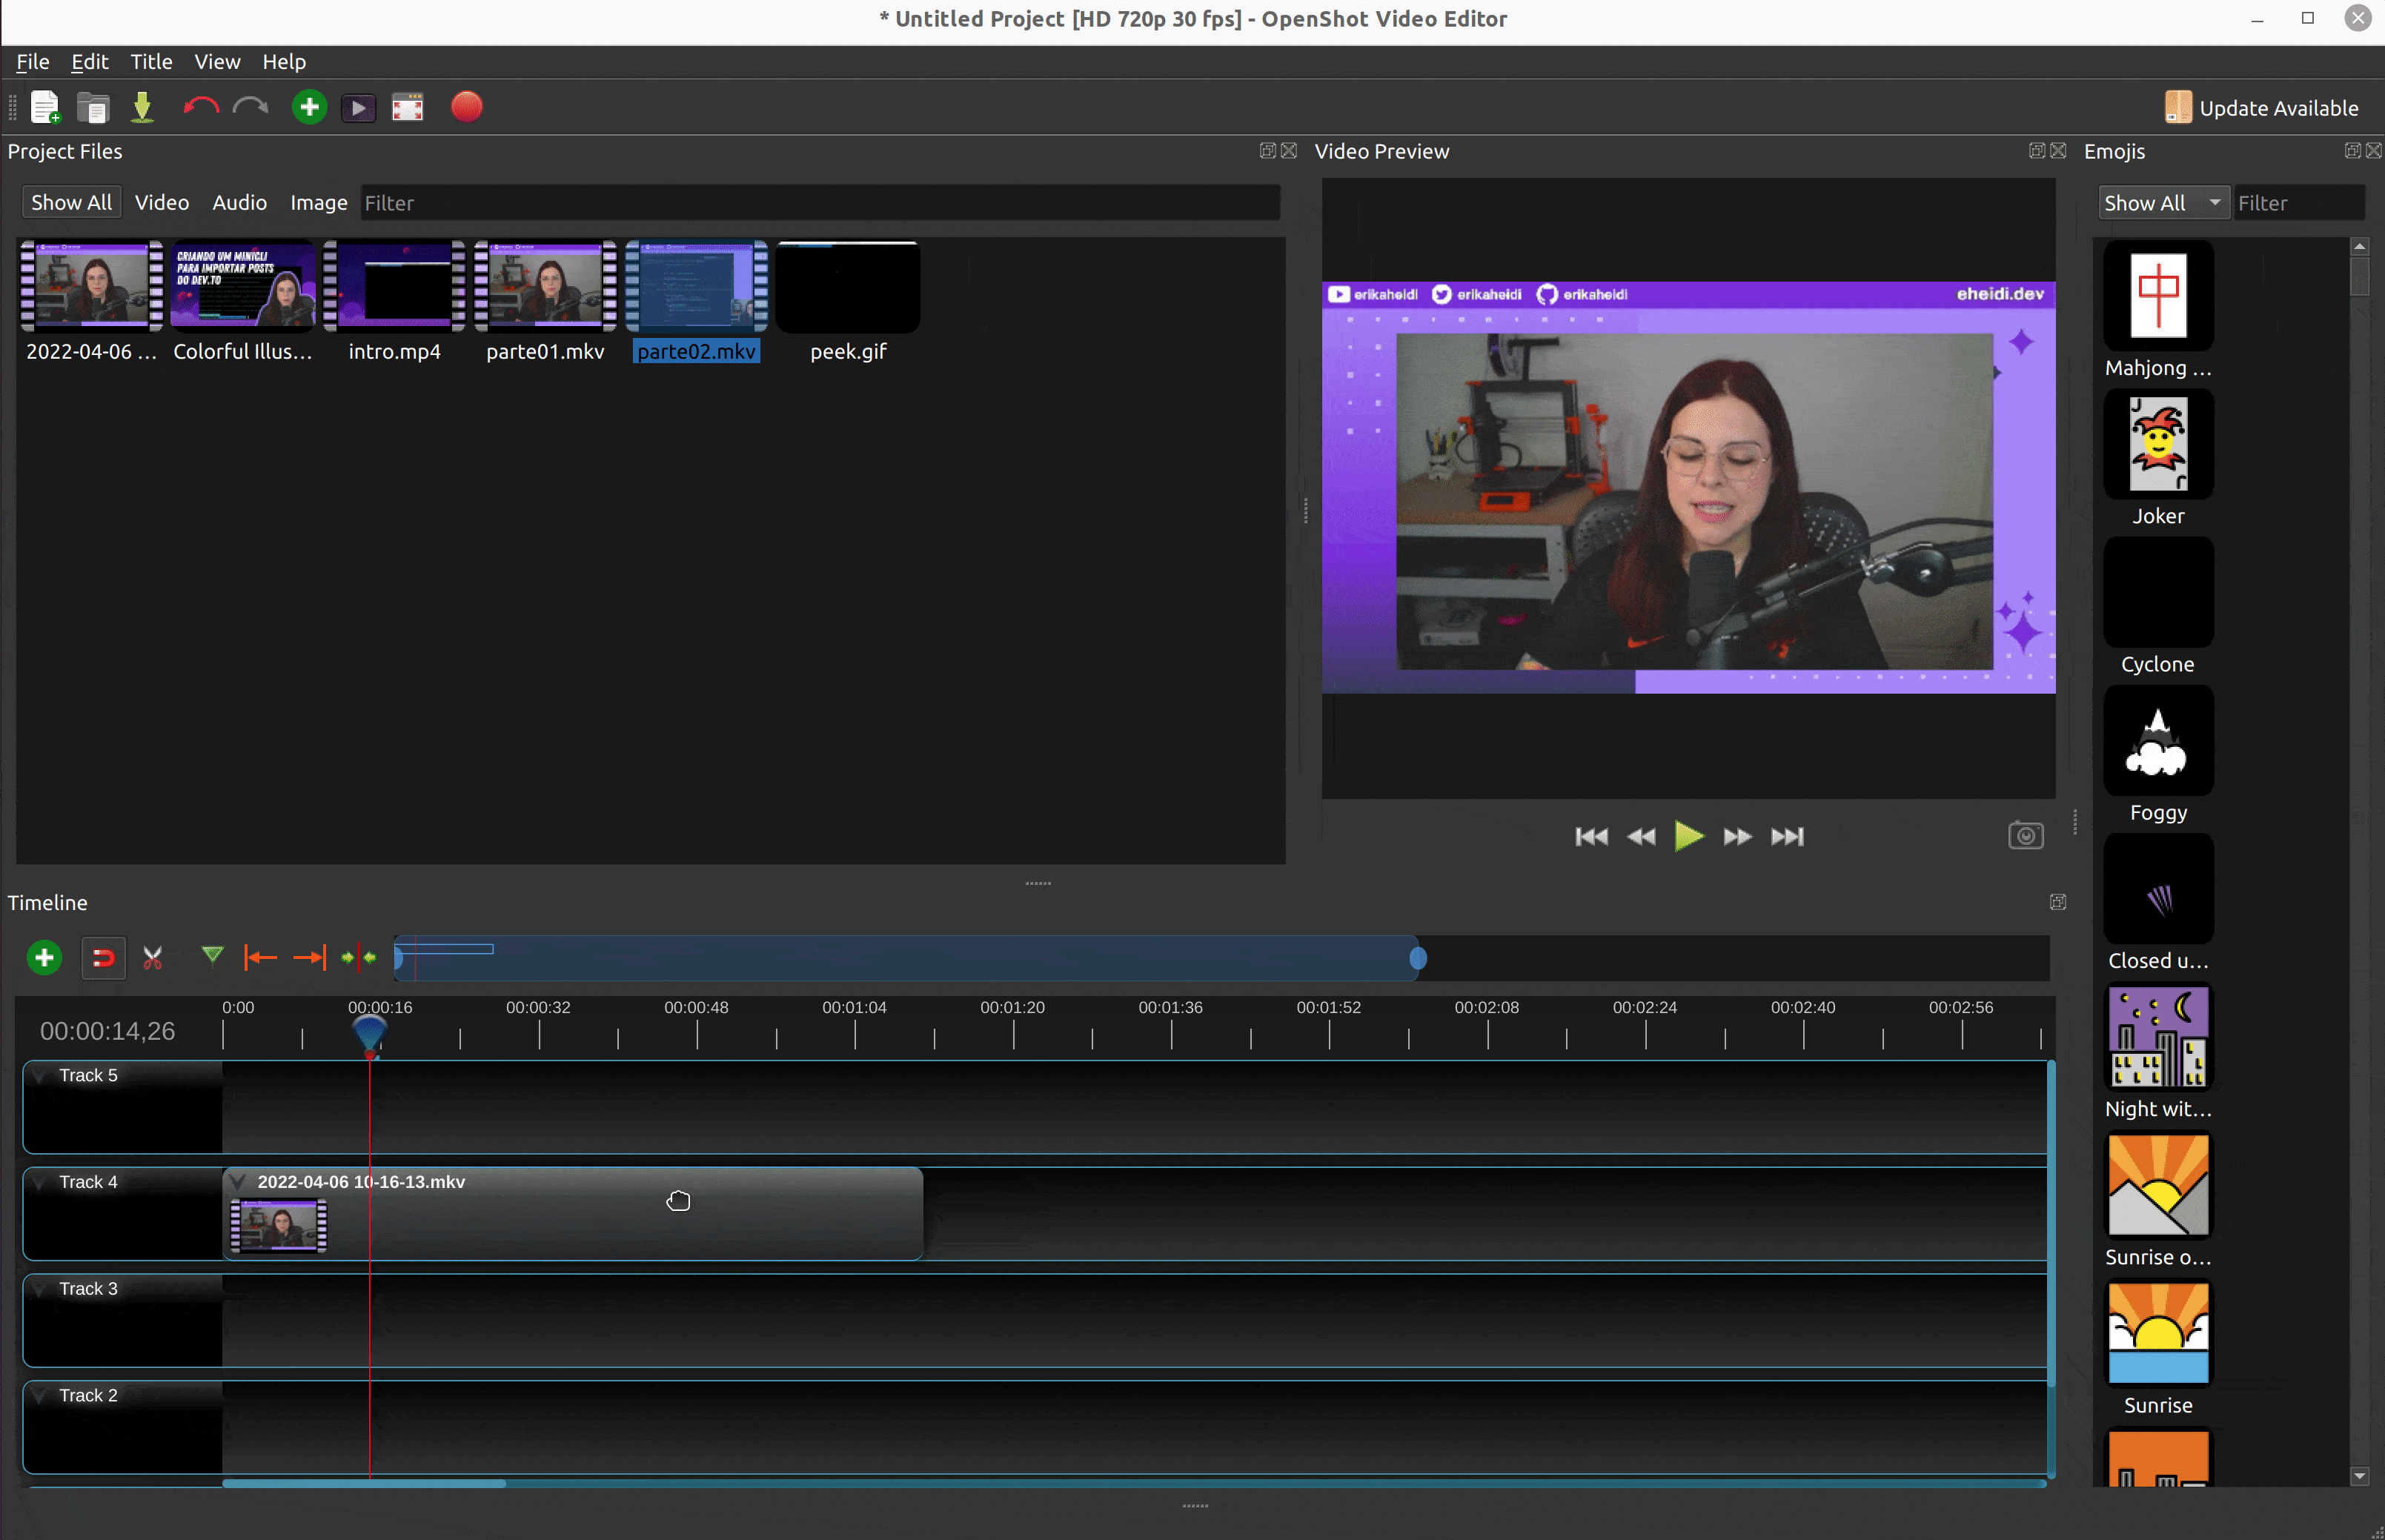
Getting Familiar with OpenShot's Interface
After opening the OpenShot application, you should see an interface like this (version 2.6+), with 3 main areas:

- 1: The project area. This is where you'll have all media files that you want to use in the project.
- 2: The preview area. This is where you can visualize your edited video.
- 3: The tracks area. This is where you'll find all individual project tracks to "assemble" your video. You can see tracks as something similar to layers, except that they follow a timeline.
Adding Media Files to the Project
Any media files that you plan to use in the project should be added to the Project Files area before being included in the video tracks. To add media files, use the green circle button with a + on it.

You can add video files, audio files, and image files. OpenShot supports most popular formats.
Working with Multiple Tracks in OpenShot
As most video editors, OpenShot offers multiple tracks that can be used both for video and for audio. You can think of tracks as layers within a video timeline. Tracks are useful for combining multiple media files and using transparent overlays such as titles, images, logos, and watermarks. Using multiple tracks is not required, you may work with a single track for simplicity.

I would generally advise leaving one free track at the top so that you can still include transparent text or other elements on top of your video in case you need it later on. I usually work on "Track 4" and use "Track 5" for overlays.
Slicing Videos in OpenShot
Slicing / cutting videos is probably the most important part of video editing, allowing you to remove sections that aren't interesting or contain mistakes and reorganize your video content to really tell a story exactly the way you want. There are different ways to slice / split videos in OpenShot. I will show how I like to do it: first I pause the video exactly in the point where I want to split, then I go right-click on the video and select "Slice" on the menu. There are three options under this menu: "Keep both sides", "Keep left side" and "Keep right side". These are pretty self-explanatory.

Quick Reference
- Slicing and keeping both sides:
Right click menu -> Slice -> Keep Both Sides - Slicing and keeping only left side:
Right click menu -> Slice -> Keep Left Side - Slicing and keeping only right side:
Right click menu -> Slice -> Keep Right Side
Using Transitions in OpenShot
In some occasions you may want to create a transition between two segments of video. When connecting two videos on the same track, you can create a transition by creating a slight intersection of both videos, with the next video overlapping the previous one just briefly. You'll then notice a blue overlay that indicates a transition exists on that section.

You can use the Transitions menu to select a different type of transition.
Separating Audio from Video in OpenShot
Although not required for altering video volume, you may want to separate audio from video in order to have a more fine-grained control of audio synchronization or speed. To do so, access Right click menu -> Separate Audio -> Single Clip.

Quick Reference
- Separate audio from video:
Right click menu -> Separate Audio -> Single Clip
Manipulating Audio Volume in OpenShot
Depending on the video, and often when combining video with music, you'll need to mute or lower down the volume of a video. You may also want to use a "fade in" or "fade out" (when the volume gradually increases or decreases) effect when the video starts and finishes, respectively. You can do all these through the menu you'll access by right-clicking on the video segment you want to edit.

Quick Reference
- Create "fade-in" effect in the clip:
Right click menu -> Volume -> Start of the Clip -> Fade In (fast) - Create "fade-out" effect in the clip:
Right click menu -> Volume -> End of the Clip -> Fade Out (fast) - Mute Video:
Right click menu -> Volume -> Entire Clip -> Level 0% - Decrease audio levels to 90%:
Right click menu -> Volume -> Entire Clip -> Level 90%
Manipulating Video Speed in OpenShot
Another interesting feature you'll be able to access through right-clicking on a video segment is changing the video speed, under the menu item Time. You can increase or decrease the speed of the video up to 16x, and there are also options to freeze and zoom a video segment.
Be aware that this will also speed audio, so if you want to keep the audio at the original speed, you'll need to separate video and audio (Right click on video -> Separate Audio -> Single clip) and keep the audio untouched on its own track.
Quick Reference
- Speed up a video 2x (will shorten the video to half the time):
Right click menu -> Time -> Fast -> Forward -> 2X - Slow down a video 2x (will increase the video to double the time):
Right click menu -> Time -> Slow -> Forward -> 2X - Reverse a video:
Right click menu -> Time -> Normal -> Backward -> 1X - Reverse a video in 2x speed:
Right click menu -> Time -> Fast -> Backward -> 2X
Adding Text (Titles) to Videos
OpenShot includes a menu to include titles, which are basically transparent PNGs with text, on top of your videos. This can be helpful to include a few descriptions and captions to the video. Go to the top menu Title -> Title, choose a template and fill in the text for the title. This will be added as a new image media in the project files, you should then drag the title and place it a suitable track in the video timeline.

To edit an existing title, right-click on the title image in your project files and select the Edit Title menu item. You will be shown a dialog similar to the title creation, with options to choose the colors and text of the title as well as its font.
Exporting Videos
Once you are happy with your video of if you just want to generate a sample to have an idea of how the video will look at the end, you can use the File -> Export Project menu or click the button with the red circle to export the video. A dialog will open up with several options to choose from.
For the majority of my videos, I choose the "Web" profile and select the "Youtube-HD" option from the "Target" menu:

You can experiment and play around with the different formats and quality settings.
Conclusion
OpenShot is a powerful video editor that is free, open source, and cross-platform, with versions available for the most popular operating systems including Linux. It offers all the basic features you would expect from a video editor, with an intuitive and minimalist interface that is great for beginners.